This free website design guide is for novice website developers and webmasters who want to create a competitive website but don’t have website design skills.
It’s especially dedicated to those who don’t want to tie themselves to a particular CMS when planning the sequence to do everything that needs to be done to launch the website.
When you read this guide, you will know every task you need to do to create a website yourself. The site that results from this guide isn’t a low-effort website.
This guide gives you pointers on how to create a competitive CMS-based site. This guide will not give specifics for any CMS. Only the tasks you need to do on most CMS platforms.
Why Two Weeks?
Just take a look at the list of tasks of website design you will have to do. Do you think that you can do everything in less than a fortnight?
Two weeks is a bare minimum for building a website with everything in this guide. This timeframe assumes you’re working consistently each day and dedicating several hours to the project. The two-week target serves as a realistic goal that prevents perfectionism paralysis while ensuring thoroughness.
Here’s why two weeks works effectively:
-
Days 1-3: Keyword research, content planning, and site architecture design
Days 4-7: Security preparation, CMS selection, and hosting research
Days 8-10: Domain purchase, DNS setup, and CMS installation
Days 11-14: Theme selection, initial content creation, and launch preparation
You still may implement and configure everything in less or more time than half a month, and that’s alright. The key is maintaining momentum while not rushing critical security and planning steps.
Important Disclaimer: All the site architecture dimensions provided in this guide are practical recommendations based on experience, not industry standards. They represent manageable targets that make getting a website operational easier for beginners.
Preliminary Website Design Tasks
Before diving into technical implementation, successful website creation requires strategic planning. We’ll design the site via a flowchart diagram, but first, we need the foundation elements.
To create a flow diagram of your website design, we are going to need the most essential building blocks of a successful site: a main keyword and five to seven secondary keywords.
The Site’s Main Keyword
This will be the general keyword of what your site is going to be about. Your main keyword defines your site’s primary purpose and target audience.
With an example, you’ll get this concept, and you won’t need further explanations.
If I were to create a site that offers free templates for copywriters and content creators, the main keyword would be “download free copywriting templates.”
You’ll have to do both market research and keyword research to evaluate if your site is viable at the social, cultural, and commercial levels.
Market Viability Requirements: Commercially, there has to be a market for the keyword. It has to be more than 30,000 monthly searches. This threshold ensures sufficient audience interest while remaining achievable for new websites.
You’ll need to find a keyword related to your idea that has equal to or greater than 30k monthly searches.
Keyword Research Strategy: You have to try different combinations and synonyms. Remember to use keywords that are two words or more and to pick the keywords that show the lowest competition levels. Long-tail keywords (3-4 words) often provide the best balance of search volume and achievable ranking potential.
Free Keyword Research Tools:
-
Google Keyword Planner (requires a Google Ads account but is free to use)
Ubersuggest (limited free searches)
Answer The Public (question-based keyword ideas)
Google Trends (for trending topics and seasonal patterns)
The Site’s Secondary Keywords
The site’s secondary keywords are going to be the website’s sections. These keywords will form your site’s main navigation and content categories.
Ideally, your niche has a market for both the main keyword and the secondary ones, but if it doesn’t, it doesn’t matter. Focus on picking the ones that have the highest monthly searches while ensuring they remain different from each other.
What’s important at this step is to find around five keywords that relate to the main one but that are as different from each other as possible. This diversity prevents content cannibalization and creates clear site sections.
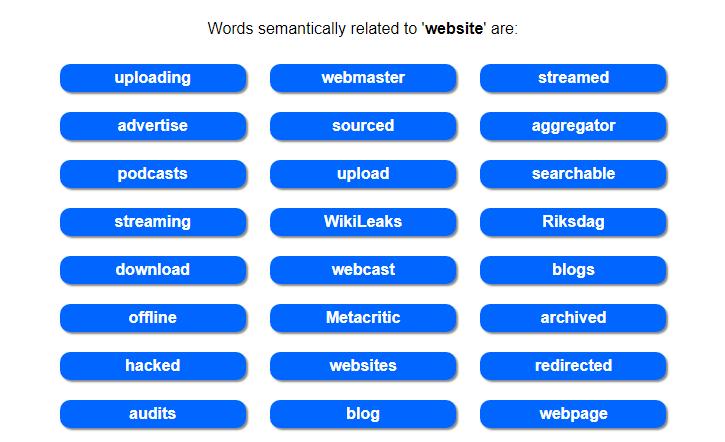
A keyword tool will give you the ideas you need. The related keywords that a tool shows will most likely be subtopics of the main keyword that you want to include in your site.
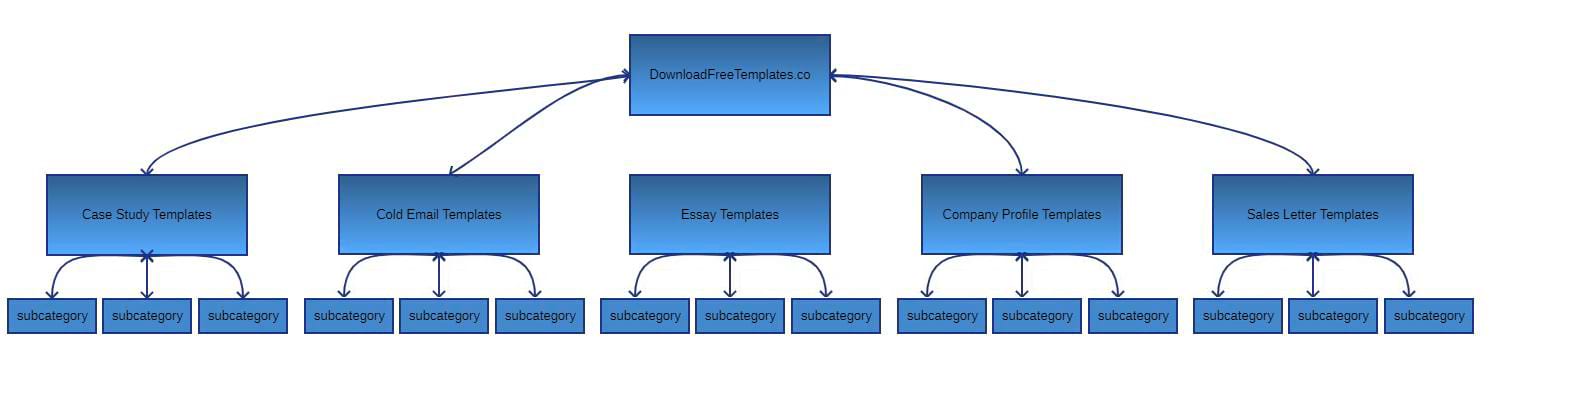
Practical Example: Continuing with the free templates website example, five keywords to make the five sections of the website could be
-
Case Study Templates
Cold Email Templates
Essay Templates
Company Profile Templates
Sales Letter Templates
You should strike a balance between monthly searches and sections on your website (remember from five to seven only) and ease of use, usefulness, and value for visitors.
Selection Criteria:
-
Each secondary keyword should have at least 1,000-5,000 monthly searches
Keywords should represent distinct content categories
Consider user intent: are people looking for information, tools, or solutions?
Ensure you can create substantial content for each section
Content Sites: Focus on Content Management
If you did any content management, an explanation of why I included it in the preliminary phase is in order.
By now you have your main keyword and five to seven secondary ones, right? With that foundation, you can start doing some content management.
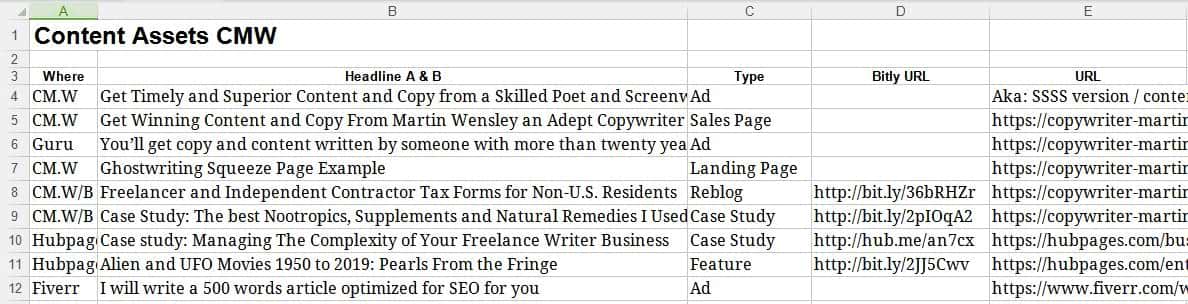
You need to use a spreadsheet or a table with five columns in an RTF or DOC document. It has to have the sections of your website design, each as the heading of a column. In the cells of each column, you will write content ideas, one per line.
Content Planning Template: Create a spreadsheet with these columns:
-
Section Name (based on secondary keywords)
Article Title Ideas
Target Keyword for Each Article
Content Type (tutorial, list, review, etc.)
Priority Level (high, medium, low)
Manage Your Content
This will be how you’ll organize which article will go in which section. Content management is something you may be doing for a long time.
A site without content is not something that’s going to gain you a following, conversions, or whatever the purpose of the site is. It will become a lifeless place similar to an abandoned house if you don’t feed it constantly with fresh, valuable content.
The content management aspect of your site depends a lot on different factors, especially on how you’ll handle the content that you have at different stages of development and the one you already have live on the site.
Critical Content Decisions:
-
Will you create it yourself?
Will you commission it from freelance writers?
Will you manage it, or will someone else manage it?
How is it going to be managed? With offline regular documents?
With documents on the cloud?
With a content management extension on the site itself?
Content Requirements: The important thing you need to know is that for a site with five sections, you need a minimum of around six articles per section. This creates a foundation of authority and gives search engines sufficient content to understand your site’s purpose.
You can calculate how many pages the site needs, per section, before opening it to the public by dividing 30 by the number of sections your site will have.
Content Creation Strategy: The initial content management takeaway is that your site has to have at least thirty pages of quality content before you open it to visitors. This isn’t an arbitrary entity that will allow you to shape your site’s theme and make it understandable for both humans and search engine spiders.
Content Sourcing Options: You could commission someone else to write all of your site’s 30 initial pages. You could write yourself all of the site’s pages that the site will have on launch day. Whatever way you approach this, you’ll also have to decide who’ll write the content after launch: you, the writers you commission, or even your visitors through user-generated content.
Content Quality Standards: Each piece of content should be
-
At least 800-1,200 words for substantial articles
Optimized for your target keywords without keyword stuffing
Providing genuine value to your target audience
Including relevant internal links to other sections
Featuring clear headings and readable formatting
Thirty pages of quality content represent a solid foundation, but remember that content creation is an ongoing process. Plan for adding 2-4 new pieces of content weekly after launch to maintain momentum and search engine interest.
Website Design
For the initial website design, only pen and paper will do. This hands-on approach forces you to think about structure before getting distracted by aesthetics or technical features.
If you want to do it digitally, you can use a flowchart design app like Evolus Pencil or Draw.io for this task. Free alternatives include Lucidchart (with limitations) or even Google Drawings for simple diagrams.
If you see yourself as a straight-to-the-point person and like to make an effort now and profit later, I’d also recommend using a spreadsheet. The visual component is missing, but you’re investing in a future-proof document since you’ll be using it to manage content for the entire website lifecycle.
But let’s suppose you chose the visual approach.
If your site is going to be relatively flat, meaning that the most your visitors will drill down is one click away from the homepage, then probably you don’t need to invest too much time in creating the prototype website design.
But this approach is certainly very helpful when you decide each section of the site is going to have subsections.
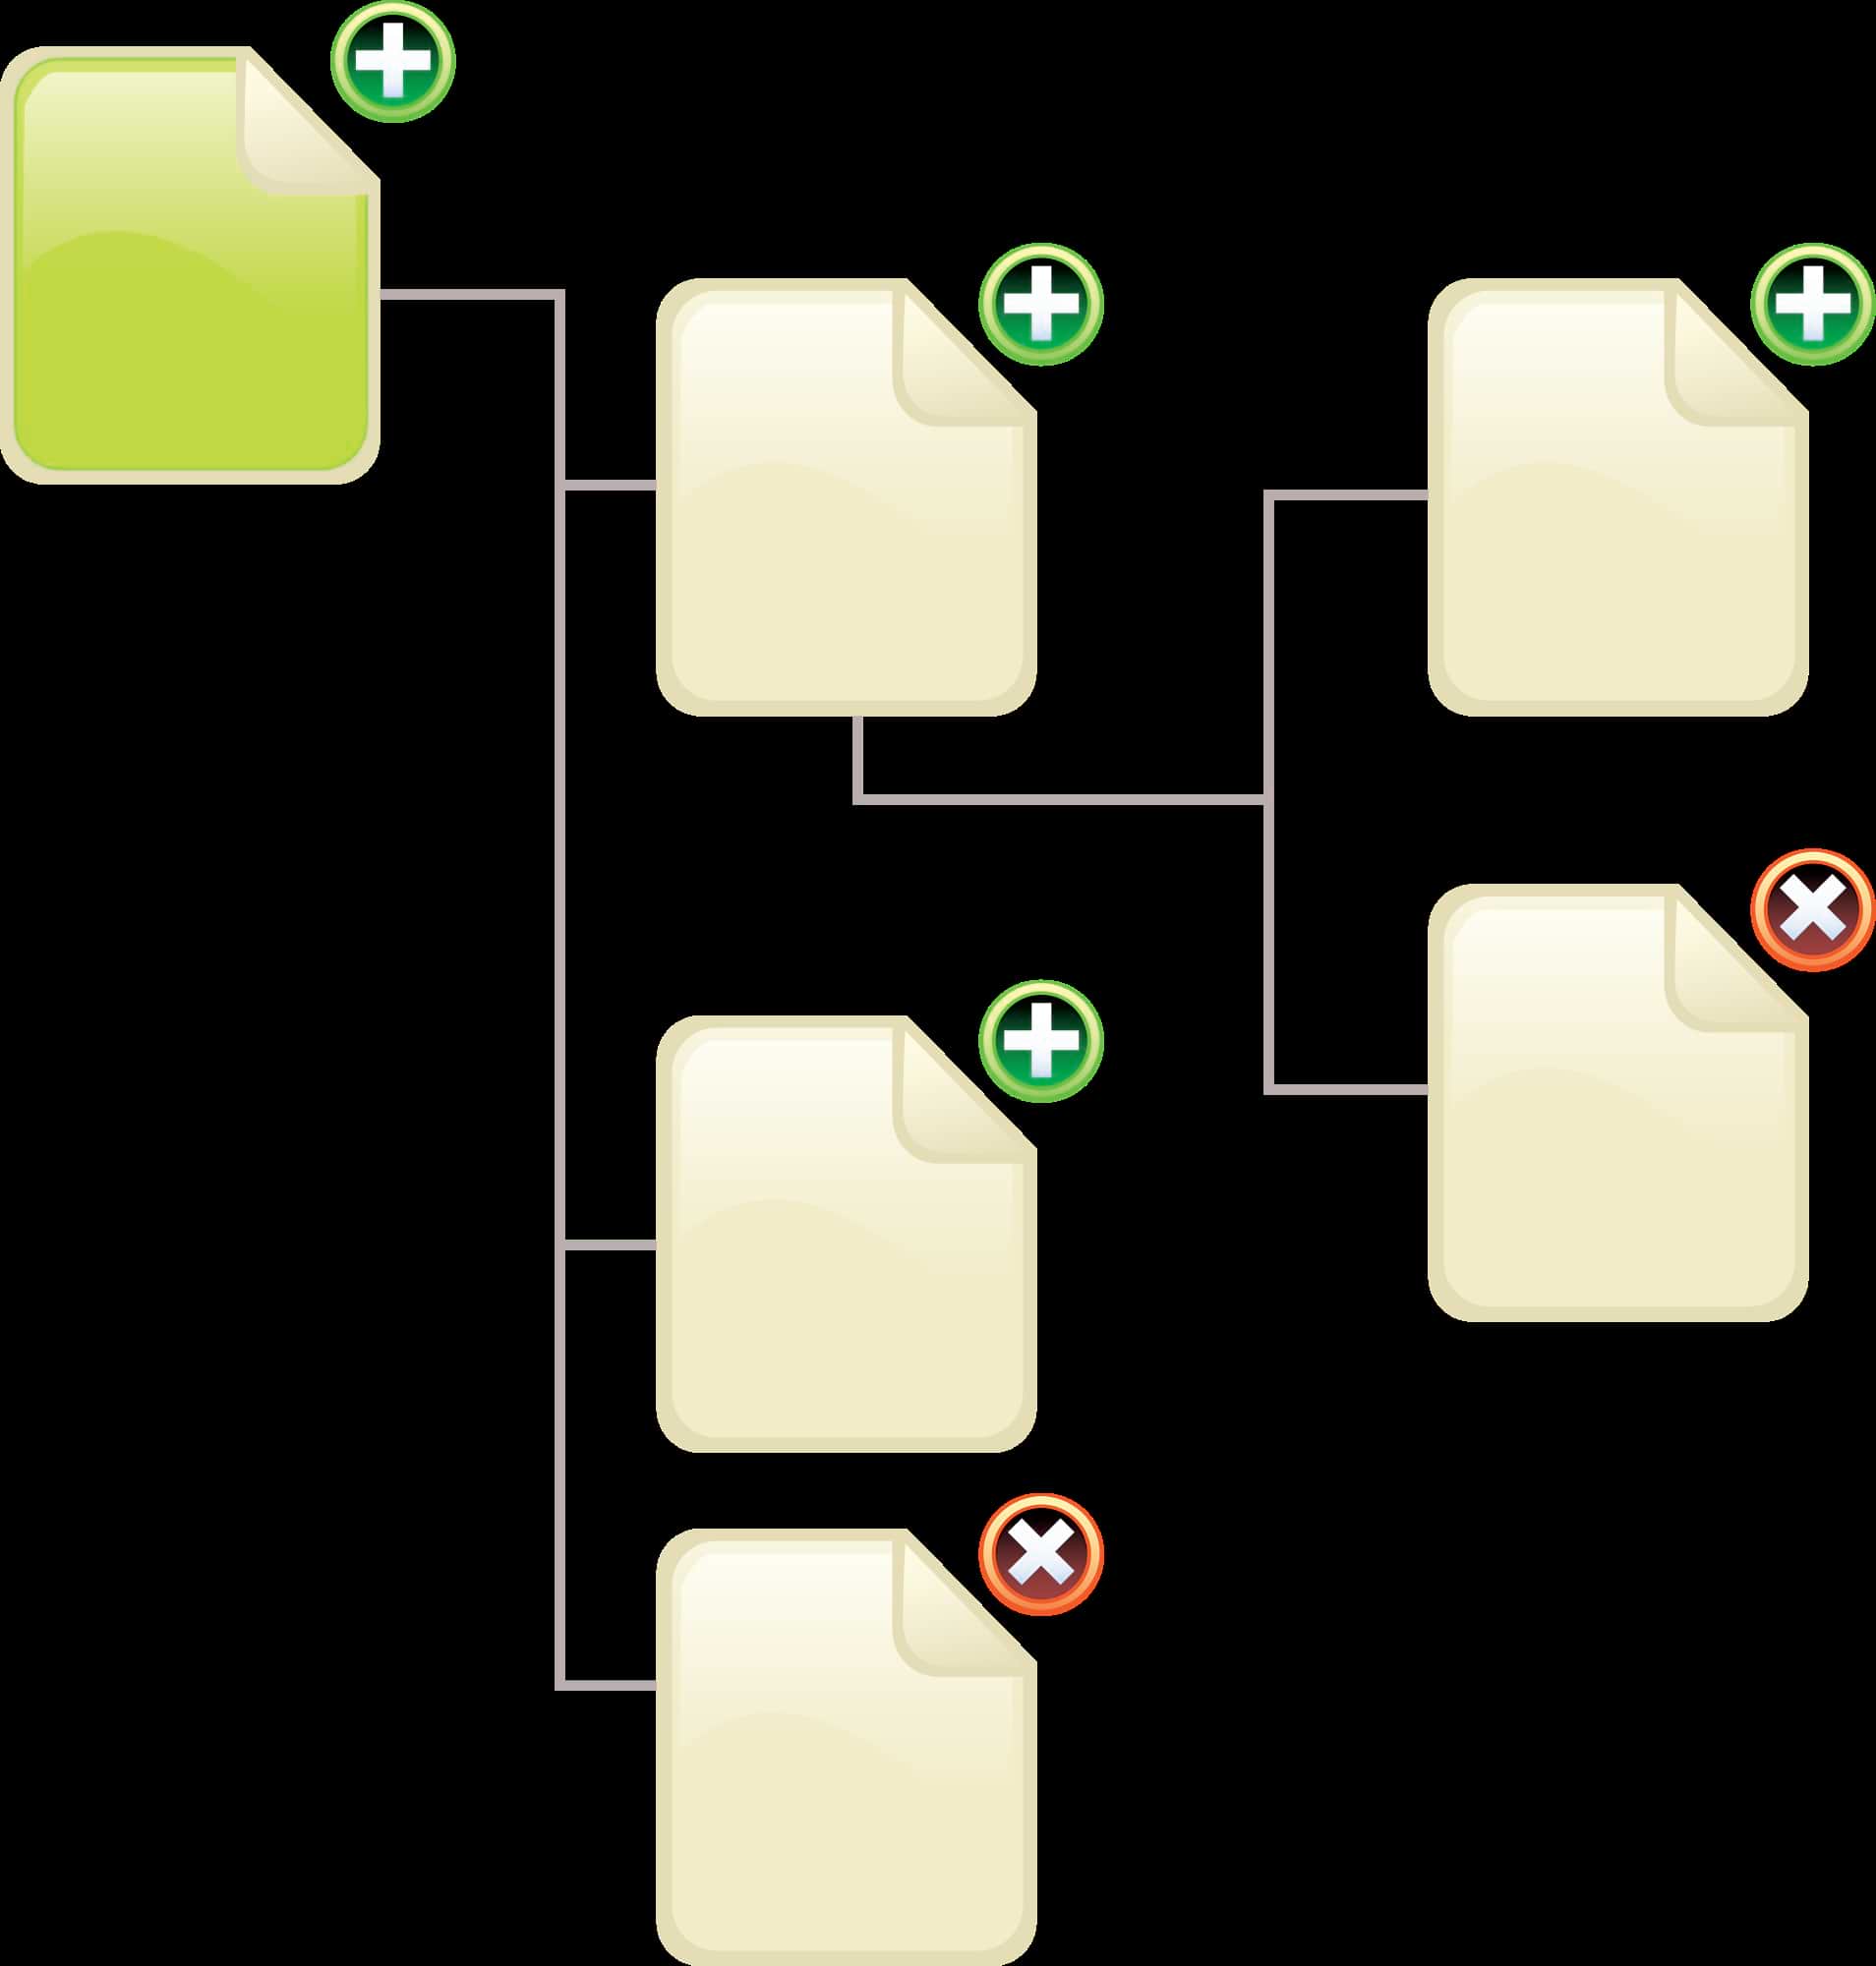
Flowchart the Site
What you’ll do is draft an inverted tree flowchart in which the top cell will be called just “/” or your site’s domain name. That’s your homepage.
Then draw as many lines as there are sections, each with a cell at the end. Inside each cell, write the sections’ names.
Basic Site Structure Example:
Homepage (/)
├── Section 1 (Case Study Templates)
├── Section 2 (Cold Email Templates)
├── Section 3 (Essay Templates)
├── Section 4 (Company Profile Templates)
└── Section 5 (Sales Letter Templates)
Let’s add a second level to your site’s sections. This second level will have three subsections per section. That would make your website structure more comprehensive.
Extended Site Structure:
Homepage (/)
├── Case Study Templates
│ ├── Business Case Studies
│ ├── Marketing Case Studies
│ └── Technical Case Studies
├── Cold Email Templates
│ ├── Sales Outreach
│ ├── Networking Emails
│ └── Follow-up Sequences
└── [Continue for other sections...]
No matter how many drill-down levels you decide to add to your website (hopefully you’ll keep it simple), there’s another set of pages you need to consider: your legal pages.
Essential Legal Pages:
-
Privacy Policy (required by GDPR and other regulations)
Terms of Use/Service (protects your site legally)
Contact (builds trust and may be legally required)
Sitemap (helps search engines understand your structure)
About (establishes credibility and connection)
You’ll have to draw a line that goes either to the left or the right of your site’s content silos into a cell named “Legal Menu.” From the legal menu’s cell, draw lines and cells to cover as many legal pages as the site will have.
Legal Page Placement: Remember that the best place to put the legal menu is in the footer of your website’s template. At the end of the day, you can accommodate it elsewhere, like, for instance, in a sidebar, but remember not to mix it with your main menu at the top of the template.
Plan the Site’s Layout
The value of doing this step becomes clear once you put it into practice, even though it may seem unnecessary when first described.
You may plan the layout of your website with a pen and paper or even with a GUI design application.
But unless you are a CSS and HTML developer, you may end up with a very different layout from the one you wanted to have at this stage.
If you resort to themes made by others, it may take you many tries to find a theme that is flexible enough to translate your ideal layout to the CMS. But don’t despair; sooner or later you’ll find it.
Because of this, keep it very simple. Just look for a list of different website layouts and pick one.
Common Website Layouts:
-
Single Column: Simple, mobile-friendly, great for blogs
Two Column: Main content + sidebar, traditional and functional
Three Columns: Main content + two sidebars, information-heavy sites
Grid Layout: Multiple content blocks, good for portfolios or catalogs
Magazine Style: Complex layout with featured content areas
Draw a wireframe diagram of the layout on paper or digitally. Make arrowheads and write what you would like in each section.
Layout Planning Example: For instance, if I want a website that has a header, menu, body section, footer, and one sidebar. I would draw arrowheads from each of these sections and note what each section will have:
-
Header: hero image, site logo, tagline
Menu: main menu with five SEO sections
Body: rich content articles and other media
Sidebar: social media widgets, newsletter signup, related posts
Footer: legal menu, email capture form, contact information, social links
Plan the dynamic components.
Until now you were planning the structure, layout, and substance of your website. With actual ideas of how the site will look at the structural level and what the site’s pages will have in the form of content, we can plan for more advanced components.
Below are several types of dynamic components to consider:
Access
If users are able to register and own an account on your site, all the user-access functionality becomes relevant.
When you allow users to log in to a site, you have to manage them. To give an example, you need to create user templates that have different permissions.
User Management Considerations:
-
Registration Process: Simple email/password or social login options
User Roles: Admin, editor, subscriber, contributor levels
Profile Management: User dashboard, password reset functionality
Content Access: Members-only content, download permissions
Giving users access to your site involves both front-end and back-end work. For example, you may want to show users a different dashboard than the one admins see.
For website user access, at the very least you will need a login page and some way to manage login data input, like a forms plugin.
Forms and Website Design
Forms are the most common points in a website where users can enter input other than clicks. Generally, it’s contact data, but sometimes it can be messages, content submissions, or similar interactions.
Common Form Types:
-
Contact Forms: Basic inquiry and support requests
Newsletter Signup: Email list building and marketing
User Registration: Account creation and management
Content Submission: User-generated content, guest posts
Survey Forms: Market research and user feedback
Download Forms: Lead capture for resources
Forms capture emails for lists, receive contact messages from visitors, enter user data into the CMS, and perform similar operations.
Don’t forget the more uncommon uses you can give to forms, like creating surveys for your visitors to fill out or building interactive calculators relevant to your niche.
Form Design Best Practices:
-
Keep forms as short as possible while gathering necessary information.
Use clear labels and helpful placeholder text
Include privacy statements for data collection
Implement spam protection (CAPTCHA or similar)
Design mobile-friendly form layouts
Content Presentations
A site that will only dispense content that approaches monetization through a discreet method, like inline affiliate links, will have a different content presentation than one that is openly a sales portal.
Content-Focused Sites: In content-focused sites, the commercial angle of a page is buried in strategic spots of the quality content that the website offers to its visitors, and the promotion of a product or service doesn’t come in an intrusive or interrupting way to the reader.
Sales Portal Sites: In contrast, a sales portal will have a presentation formatted like a catalog with capsules of products and detailed product descriptions.
A sales portal naturally may have, elsewhere on the page and separate from the products, a determined quantity of non-commercial copy, but its primary focus is the product listings.
Content Presentation Strategies: How is the content on your website going to be curated, aggregated, and embedded in the site’s pages?
-
List Format: Simple, scannable, great for tutorials and resources
Grid Layout: Visual appeal, good for portfolios and product showcases
Card Design: Modern, mobile-friendly, works for various content types
Timeline Layout: Perfect for process explanations and case studies
Comparison Tables: Excellent for product reviews and feature comparisons
Are you going to use lists, grids, or something else? Is the presentation going to be visual, or would you prefer a more text-focused, minimalist approach?
Modern Content Requirements: Whatever the case, you can’t have just plain pages with content and media, comments from the readers, and nothing else. Modern websites require sophisticated content presentation that encourages engagement and exploration.
The takeaway of content aggregation and presentation is that in the silo approach, all the articles in a section have to touch similar topics and link among themselves, and you achieve that by
Internal Linking Strategy: A) Linking to other pages in the site’s section to which the page belongs, in the main content of the page.
B) Aggregating a selection of pages from the site’s section at the bottom of each article page in a widget.
We will return to this topic in depth in the future, after the installation of the website’s CMS.
Widgets
Widgets are smaller areas around the page’s content’s main body area. They provide supplementary functionality and information that enhances the main content experience.
Effective Widget Applications: A good use of a template’s widget slot would be to use it for a so-called ’related posts plugin.’ Through a shortcode that you put in a widget, you get either visual capsules of related articles or just the headlines of the same in text-only mode.
Third-Party Service Integration: If you want to integrate a third-party service on your pages via a widget, it’s probable that at least one way to do it, for those who aren’t programmers, exists.
Keep in mind that some of these would be considered an integration, or live widget.
Popular Widget Types:
-
Social Media Feeds: Display recent posts from your social accounts
Email Newsletter Signup: Capture leads throughout the site
Recent Posts: Keep visitors engaged with fresh content
Search Functionality: Help users find specific information
Testimonials: Build trust and credibility
Call-to-Action Buttons: Drive specific user actions
Also, if there’s some functionality that you are certain your site must have in a widget, it’s probable you’ll find a plugin that does it.
A lot of the time you can find many free alternatives, but it takes time to test them all. This is advice you should remember every time the word plugin is mentioned in this guide.
Website Design Integrations
Integrations are nothing more than a live (enhanced, if you will) widget.
Let me clarify that statement. Almost always integration with other websites (like Facebook, Twitter, or Instagram) will be contained in a widget section of the site’s template.
The only difference is that integrations are constantly checking the channels you connected them to for updates and pulling data from those updates to replicate it in some form on your website.
They are not mere embeds since integration services are managed by plugins that add versatility to the features and presentation.
Popular Integration Examples:
-
Social Media Streams: Automatically display your latest social posts
Email Marketing Platforms: Sync newsletter signups with your email service
Analytics Tools: Track visitor behavior and site performance
Customer Support Chat: Provide real-time assistance
E-commerce Platforms: Manage products and orders seamlessly
Professional Email: Create as many email accounts with your TLD as your plan allows
Automation Considerations
Automating processes for your site is an advanced subject, and it goes beyond the scope of this guide.
It does so for a reason: automation tactics are too specific, not only to the type of site you’re building but also to the third-party apps and services you use.
If you haven’t already, you should check out IFTTT and Zapier and see how creating automation on either of these two platforms can benefit your site.
Basic Automation Examples:
-
Auto-post new blog articles to social media
Send welcome emails to new subscribers
Create social media posts from RSS feeds
Backup site content to cloud storage
Monitor site uptime and send alerts
Other than that, sometimes CMSs have features to automate something, like, for instance, automatic updates of the CMS, the site’s theme, or its plugins.
Pre-Deployment Tasks
You’ll have to decide which modality you’ll use to develop your website. This decision affects your security approach, development timeline, and learning curve.
Development Environment Options:
-
Local Development: Build the site on your computer first
Remote Staging: Develop on a private server environment
Live Development: Build directly on your public server
Recommendation for Beginners: I’ll recommend those developing a site with a CMS for the first time to do it locally. Anyway, I’m not going to explain how to do it locally—it’s the safe way, but it takes more work to get started.
To me, it was always a hassle to do it this way and then have to upload it to the server, but I did it a few times anyway for good reason.
Critical Security Warning: If you have not developed a website with a CMS, please remember this for the first few years: there are too many failure points in a website’s security for a novice, and it’s better to get acquainted with how a CMS works by staging it locally, without any of the risks involved in doing it live.
A careless approach can rapidly become a nightmare scenario. If you are new and don’t know what you’re doing, a malicious hacker can take ownership of your website faster than you think.
The Compromise Scenario: You aren’t going to notice a compromise at first, and all the work you will do on the website will be at the mercy of whoever took over. You will be developing in a tainted environment, and by the time you notice what is happening, the site is compromised and unreliable enough to be scrapped, and you will be back at square one.
OpSec Considerations
After you read one, two, or three security guides that are specific to the CMS of your choice and you are sure you have hardened your site enough for it not to be a gift to malicious hackers, you can go the extra mile and apply sophisticated operational security tactics.
Before I share some of the operational security measures I employ with my websites, I want to give the takeaway from this section of the guide upfront.
Development Environment Impact on Security: If you develop the site locally, you can do all these security tasks with a certain feeling of ease, and you don’t need to hurry, since the clock is not against you in a race to secure the website before it becomes compromised.
But if you are going to develop your site live, the very first things you do must be these security tasks, and they have to be done right away, as soon as the CMS finishes installing.
Easy Website OpSec Tactics
Basic Security Fundamentals:
-
Create a hard-to-guess admin username (never use “admin” or your business name)
Create a strong admin password (minimum 16 characters, mixed case, numbers, symbols)
Never save login credentials in the browser
Save all your passwords in an encrypted offline password database
Password Management Strategy: Use a dedicated password manager like KeePass, Bitwarden, or 1Password. Generate unique, complex passwords for every account related to your website.
You should create a website hardening checklist and complete all its tasks. Some of the things that go in a checklist of this kind:
Essential Hardening Tasks:
-
Change all default passwords immediately
Remove or rename default admin accounts
Disable unnecessary services and feature.
Configure secure file permissions
Enable two-factor authentication where available
Remove version information from headers
Configure secure HTTP headers
Firewall and More
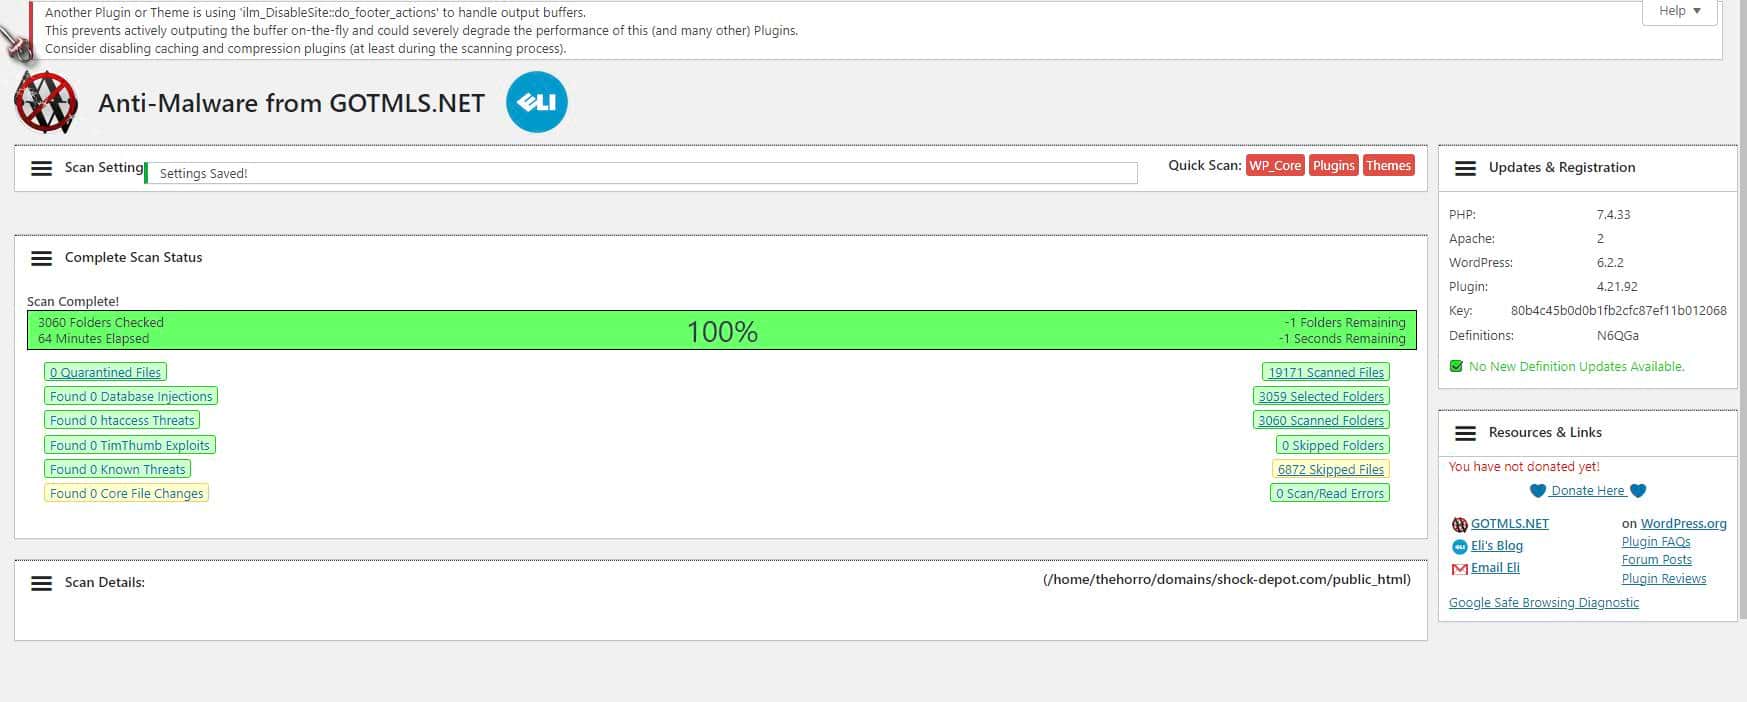
If your CMS has a plugin that acts as a firewall, install it soon after installing the CMS itself.
The most common moments to do this are right then and there, as one of the first tasks you perform on your freshly installed CMS.
Why Install Security Plugins First: There are many reasons why you may not want to run a firewall on your website, but there is an important reason why it should be one of the first plugins you install. Even if you uninstall it after running one or two security scans with it.
That’s because it will spot many security holes that your site has at the structural level, and these are things that must be fixed right away.
Firewall Functionality: A firewall is not just a debugger of the site’s security; it’s engineered to protect the site from attacks, intrusions, rogue plugins, and other threats.
You will have to weigh the pros and cons of running a firewall and decide if, after the initial security audit that most of them perform, you’re going to keep using it.
Additional Security Plugins: There are also anti-malware and anti-virus plugins, and these become very handy when the site begins to grow beyond twenty or so plugins.
You may be installing too many plugins too rapidly, and there’s the possibility you’ll install something harmful to the site.
It seemed surprising to me when I first discovered them, but at the end of the day, having anti-malware and anti-virus protection on a site may save it from disaster.
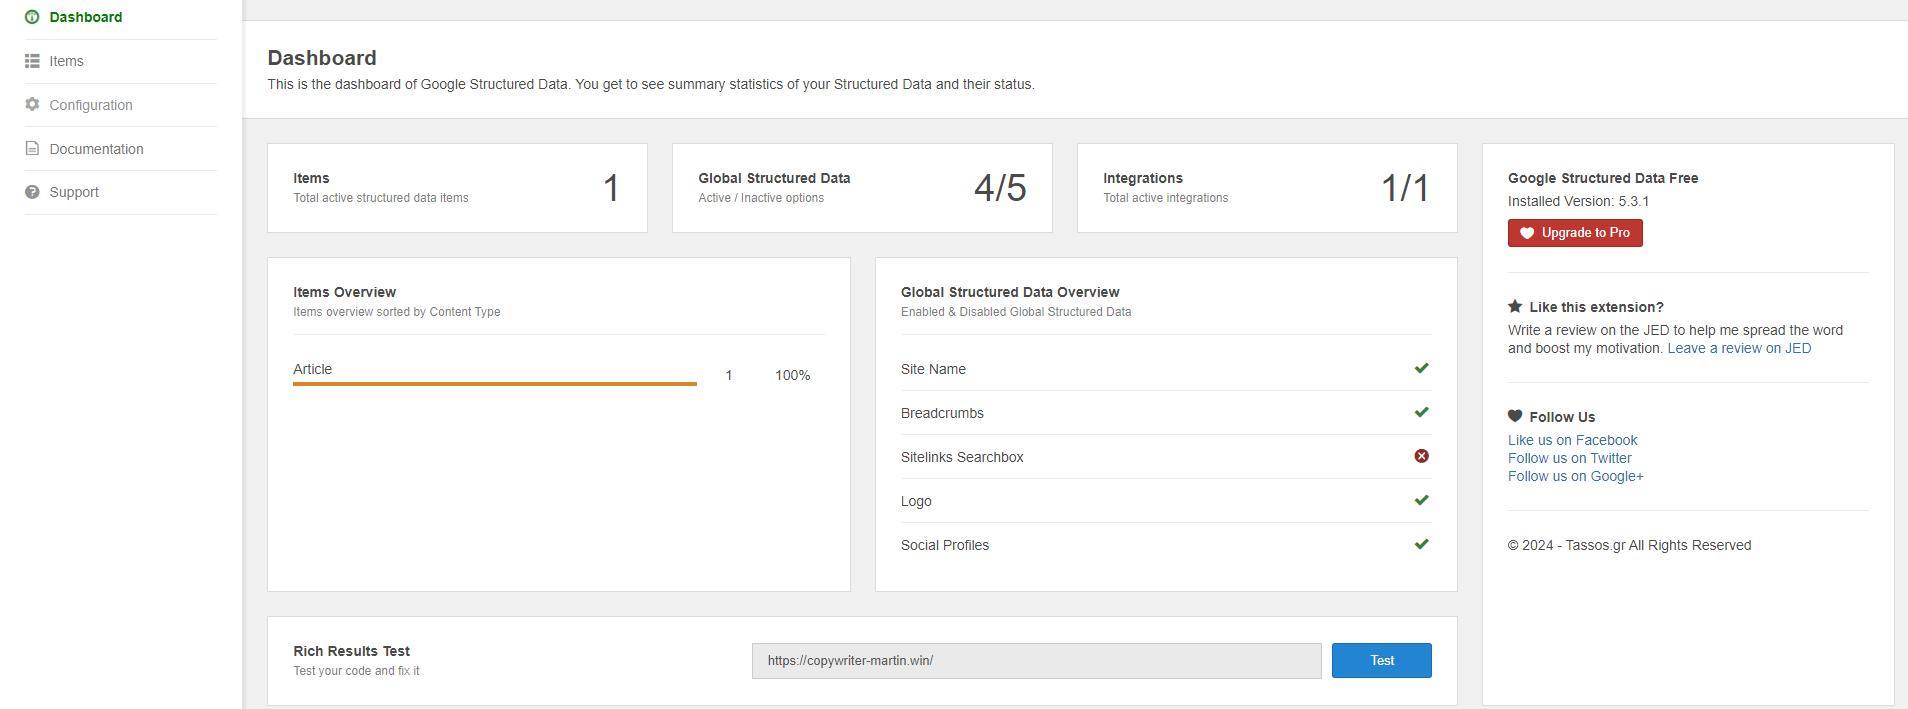
Integrity and Health Checkers
They’re two different types of software, but sometimes the line that separates them blurs, and you get one that includes the functions of the other.
File Integrity Monitoring: One is a security plugin that verifies the integrity of the core CMS files. It will tell if any of those files were tampered with and guide you in the steps to correct the issue.
Site Health Monitoring: Site health checkers aren’t oriented towards security, but sometimes they have features that alert you to potential security issues. They monitor performance, broken links, outdated plugins, and other maintenance needs.
Online Site Security Audits
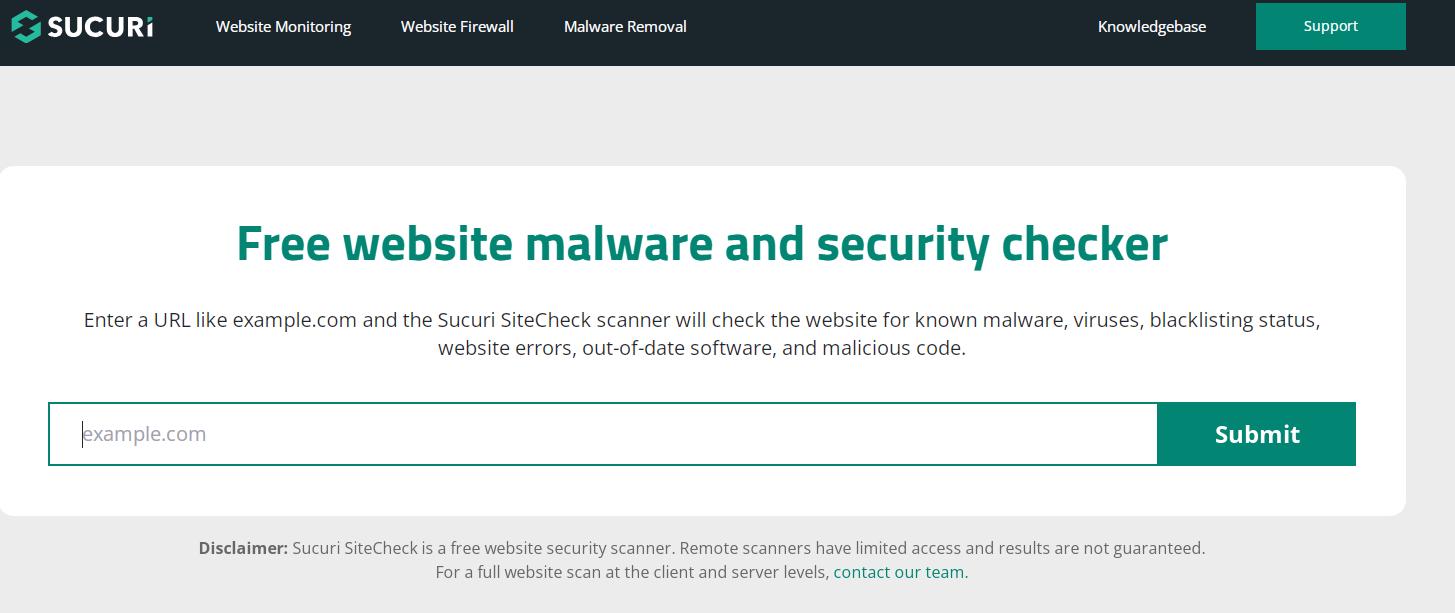
There are a few free web applications where the only thing you need to do is input your site’s URL, and the app will check the site for security risks.
Generally, these apps will not only alert you about the weak points of your site but will also guide you to correct the issues.
Recommended Security Audit Tools:
-
Security Headers(securityheaders.com): Analyzes HTTP security headers
SSL Labs SSL Test(ssllabs.com): Tests SSL/TLS configuration
Mozilla Observatory(observatory.mozilla.org): Comprehensive security analysis
Content Security Policy Validator: Checks CSP implementation
Qualys SSL Checker: Additional SSL/TLS testing
Using Security Audit Results: After running these audits, prioritize fixing issues marked as “high” or “critical” first. Many of these tools provide step-by-step instructions for resolving identified problems.
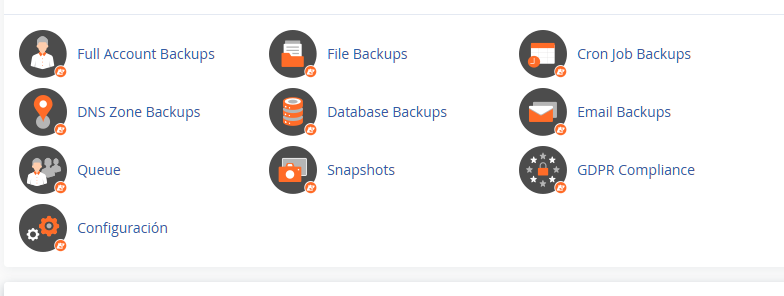
Create Security Copies of the Site
Also known as backups. You need one that is proven to work. Don’t trust something as important as this to an untested plugin or solution.
Backup Strategy Essentials: You must do backups of your site from day one, and you must double-check the backup archives the plugin you use creates for contents, or at least compare its size to the site’s size.
Backup Verification Process:
-
Test restore procedures on a staging environment
Verify backup file integrity and completeness
Document your backup and restore process
Store backups in multiple locations (local and cloud)
Another thing you can do about your backup is do a little due diligence on the web and see what other webmasters say about it. Did it save their bacon at least once?
Backup Best Practices:
-
Automate daily backups
Keep multiple backup versions (daily, weekly, monthly)
Store backups separately from your main server
Include both files and database in backups
Test the restoration process regularly
Hard-Targeting Techniques
Hard-targeting is a fancy way of saying security through obscurity. You should never fully rely on these techniques, but they certainly add a nice layer of hardening.
Obscurity Techniques:
-
Obfuscate the CMS’s login page: make it different from the default both visually and make it have a different URL; users don’t need to know the URL the CMS uses for admin access.
Remove default pages: If you know what you’re doing, remember to delete as many default pages that come with CMS installations. Unless one of the pages that come with a fresh installation has a function or presentation you need, you’re better off deleting it.
Remove CMS branding: remove all mentions of your CMS’s brand from your website’s pages. If attackers have it more difficult to find out what CMS you’re using, it’s going to be harder for them to know the site’s weak points.
Additional Hardening Measures:
-
Change default file and directory names
Disable directory browsing
Remove version numbers from CSS and JS files
Use custom error pages that don’t reveal system information
Hide sensitive files from public access
Create 0-Day Exploit Alerts.
You must use a service like Google Alerts and create a few alerts to be notified ASAP about the discovery of new CMS and plugin exploits.
Recommended Alert Keywords: Replace [CMS] with the brand name of the CMS your website uses.
-
[CMS] 0-day
[CMS] exploit
[CMS] plugin bug
[CMS] vulnerability
[CMS] zero-day exploit
Additional Monitoring Sources:
-
Subscribe to your CMS’s official security blog
Follow security researchers on Twitter
Join relevant security forums and communities
Set up RSS feeds for security news sites
Monitor vulnerability databases like CVE
Server-level Security
If you use one of the popular CMSs, you may never need to enter your site via its FTP server and do tasks directly by manipulating the site’s files.
I’m saying, as a webmaster, you shouldn’t need to mess with stuff at the level of a systems administrator, like changing the permissions of files and folders.
But as I wrote, mishaps happen.
When Server-Level Access is Necessary: When you know which thing or action broke what, and you know that by entering the FTP and doing a simple thing you’ll fix it, that’s okay.
But don’t think that everything is as user-intuitive when dealing with the files directly.
File Permissions Warning: When you start to mess with things like file permissions, you better know what you’re doing. My advice would be to never touch them, even when a plugin pushes you to do it.
It’s very easy to break your site or create a security breach if you change file permissions without really knowing the implications of the functionality and security levels.
Server Security Best Practices:
-
Keep server software updated
Disable unused services and ports
Use secure protocols (SFTP instead of FTP)
Implement proper file permissions (644 for files, 755 for directories)
Regular security audits and monitoring
Use reputable hosting providers with good security records
Common File Permission Guidelines:
-
Directories: 755 (owner can read/write/execute, group and others can read/execute)
Files: 644 (owner can read/write, group and others can read only)
Configuration files: 600 (owner can read/write only)
Never set permissions to 777 unless absolutely necessary and temporary
Free Website Design Resources Due Diligence

Once you understand the products, plans, and services currently available in the market, start searching for providers.
Begin by searching for lists of top providers on Google, Bing, or Yahoo. These lists will tell you plenty about the services but don’t trust everything you read.
This initial research gives you a general overview of market players. Write down several names.
Real due diligence means examining what actual customers say about the domain registrars and hosting services on your shortlist.
Several platforms excel for due diligence research, including Reddit and Trustpilot. Trustpilot provides tremendous value, and Reddit proves equally valuable—perhaps more so—because you can ask specific questions in forums like r/webhosting.
Search for reviews and examine what current and former customers report about each provider’s service quality.
When the hosting service you’re considering receives glowing reviews praising uptime, speed, customer support, and additional perks, you’re on the right track. Check if the pricing seems reasonable. If yes, you’re almost ready to decide.
Never forget to verify the cost of your chosen plan after the first year.
Here’s the primary takeaway when buying domain names and hosting services: providers typically raise prices when you enter the second year.
The secondary takeaway involves a technical consideration. When choosing between hosting plans with or without object cache, always select the plan that includes it.
Market Research
In this phase, you aren’t going to focus on service providers or plans.
What you need to find out at this moment is what different types of hosting are available for purchase, and what TLD (top-level domain) is most appropriate for the topic of your website.
There are many types of hosting to choose from:
-
Dedicated Hosting: The only site on the server is your site
Bare Metal Server Rental: Same as dedicated but flexible charging
Home Server: You have a symmetric internet connection and host the site on your server in your home
Virtual Private Server: You share the server but have virtual resources for your site’s use only
Cloud Hosting: Serverless hosting
Shared Hosting: Economic yes, but the quality of service reflects the price
Managed Hosting: For beginners, generally tied to a CMS brand
The same goes for TLD. I know, this may be a no-brainer for many people, the TLD should be a .com, but this may not always be the case.
Variables that will influence your choice of TLD are:
-
Price
Registrar reputation
Availability of TLD you want
As in hosting, there is a wide choice of registrars, some are good, some okay, and others downright scammy.
After you know what products, plans, and services are at that moment in the market, you must start to search for providers.
You can start by searching lists of the top providers on G, B, or Y. The lists you’ll find will say a lot of things about the services but you must not trust anything.
After you do that, you’ll have a general idea of the players in the market.
Write a few names down.
The actual due diligence consists of seeing what customers of the domain registrars and hosting services you shortlisted say about the services.
There are many sites you could use to do due diligence, like Reddit and Trustpilot. Trustpilot is very valuable, and so it’s Reddit. Maybe even more so, because you can ask questions in forums like r/webhosting.
You must search for reviews and see what current and former customers of the services say about the services the different providers give.
If the website hosting service you have in your sights has raving reviews where everyone praises its uptime, speed, customer support, and perks, then great. Is the price reasonable? Yes? Then you are almost there.
You must not forget to make sure you check how much the plan you want to purchase is going to cost after the first year.
This is the main takeaway of buying a domain name and a hosting service: most of the time the price of the service gets hiked when you enter the second year.
The second takeaway is something technical that you should be aware of. If you are at a point where you must choose a hosting plan with or without object cache, by all means, go with the one that has it as a perk.
Site Deployment
With your site designed, hosting and domain purchased, and CMS selected, begin the deployment phase.
Configuring DNS
Your new hosting plan and domain name require a DNS records setup for your website.
This step proves most challenging for anxious people, but even those with anxiety learn to manage it as they create more websites.
Setting up DNS records isn’t difficult, but the waiting period can feel frustrating.
You cannot proceed until the correct DNS settings propagate and your CMS goes live.
I know several DNS setup scenarios.
First scenario: set DNS records directly through your domain registrar’s website.
Second scenario: use Cloudflare as both an uptime solution and CDN or to access Cloudflare’s free SSL certificate.
Regardless of your approach, your DNS configuration needs at least two records:
-
An A record pointing to your site’s IP address (find this in your hosting plan’s admin panel)
A CNAME record for the naked version of your website’s domain
Enter this information in your domain registrar’s DNS options, and you’re set.
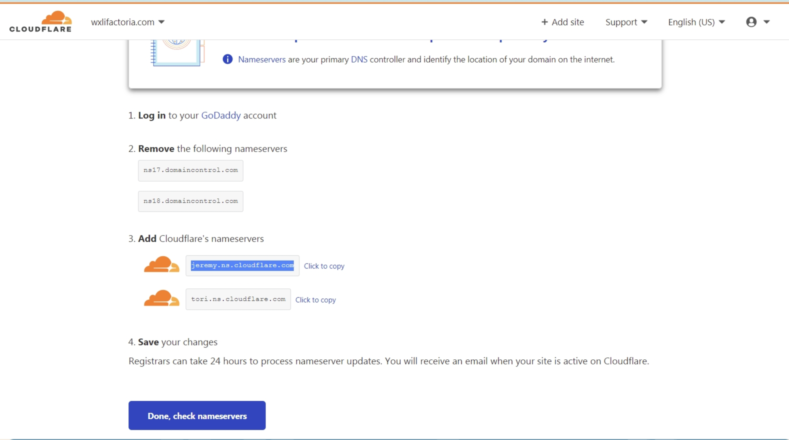
If you’re using Cloudflare, complete these additional steps:
Create your website’s profile in your Cloudflare account. Cloudflare provides two name servers when you finish setting up your site.
In your domain registrar’s DNS configuration, enter the two name servers Cloudflare provided.
Then navigate to Cloudflare and create your DNS records there.
Wherever you configure your site’s DNS records, expect to wait. Propagation can take up to three days.
Sometimes you’ll get lucky, and new DNS settings propagate within minutes or hours.
Test by entering your domain name in a browser to see what appears.
Once something displays—even a hosting service page stating no site exists yet—you’ll know DNS propagation is complete.
Installing the CMS
After your site’s DNS propagates, you can install your chosen CMS using one of two methods:
-
Use your hosting service’s CMS installation feature through the hosting admin panel.
Install the CMS manually by uploading files to the server and running an installation script.
Either approach requires reading the official documentation and installation guides for your specific CMS.
Pre-installation Tasks
Have you prepared login credential management?
Every moment leading to this point represents an opportunity to ensure strong passwords and secure storage (like an encrypted password database).
If you haven’t done this yet, do it now!
Create fresh, strong passwords for these five essential accounts:
-
Your hosting provider’s website account
Your hosting plan’s backend account (cPanel, DirectAdmin, etc.)
Your site’s database admin account (MySQL, etc.)
Your website’s FTP account
Your CMS admin account
These accounts form the foundation, but verify they all function correctly and replace any default passwords with strong alternatives.
Even non-technical users who want to develop technical skills need database access.
Future website development may break your site in ways that require direct database modifications through the CMS database.
You may need to manage additional website-related accounts:
-
Email accounts (if your hosting provider includes email)
CDN service accounts (Cloudflare or similar)
Security certificate service accounts (unless using Cloudflare’s free option)
Integrated service accounts (like SEO plugins)
Installation Proper
Since this guide remains CMS-agnostic, I won’t provide specific instructions for the five to ten minutes required to install a website.
My only advice: decline the CMS offer to install dummy content.
Some content management systems offer this feature, but my experience shows it creates more problems than benefits.
Total novices in website design and development might accept this option, but otherwise, you’ll fare better without it.
This advice applies especially when you already possess content assets for your website pages—articles, copy snippets, and similar materials. When you have existing content for test pages, avoid dummy content entirely.
Starting with a clean CMS free of extraneous content gives you flexibility. You can always install a plugin or extension later that populates your site with dummy content if you change your mind.
However, if you ignore this advice and deploy dummy content, your site will contain useless content everywhere, requiring significant cleanup effort.
Post-Installation Tasks
Once inside your CMS, update it immediately. Your installed version may lag several versions behind the latest release.
Install one or two security plugins. Like installing a fresh operating system, and adding security applications, including firewall, anti-malware, and security audit plugins.
Spend your first thirty minutes allowing security applications to complete their necessary processes.
Meanwhile, review your security audit solutions and address as many vulnerabilities as possible.
At this stage, you probably don’t need a backup solution since your site remains mostly blank.
However, if you’ve already addressed security vulnerabilities based on security audit plugin recommendations, implementing a backup solution makes sense now.
As with everything else, test your solution and research thoroughly to ensure the backup archive will prove useful during disasters.
With these tasks completed, proceed to the next step: refining all aspects of your website.
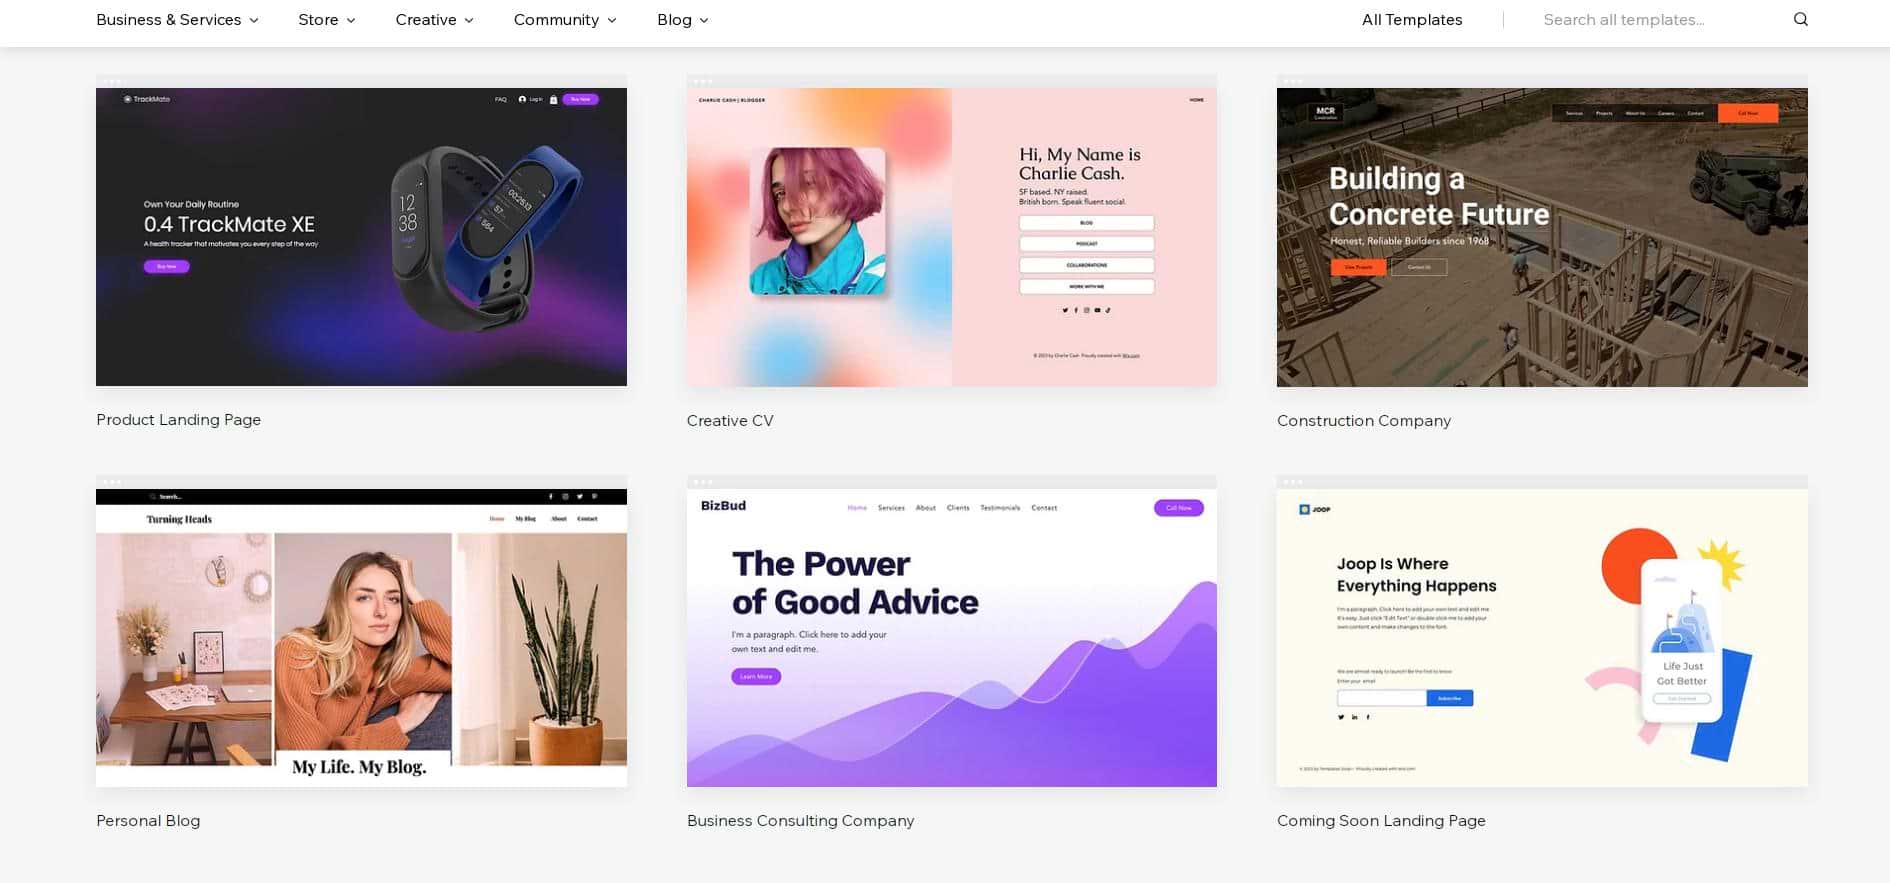
Search or Shop for a Theme
I hesitate to call a site’s theme a “skin” since it encompasses much more. Theme choice sometimes dramatically influences important site aspects like SEO.
Given this importance, invest time in research.
Which available theme will benefit your intended website type most?
Do the theme’s layout, features, widgets, flexibility, performance, and customization options convince you that you can commit long-term without limiting your site’s growth capacity?
I’ve tested nearly one hundred themes for each CMS I’ve used. Themes flood the market like pennies.
The sheer volume will overwhelm you when searching for your website theme.
Among dozens of free themes I tested, only about six proved worthwhile.
Of those six, I felt satisfied with one or at most two, because the others lacked features or had other weaknesses.
Consider the custom theme approach. Find a theme designer whose work appeals to you and purchase a theme for your CMS.
This represents a smart investment because a professionally designed site following your specifications will excel at both technical and aesthetic levels.
If you’re not ready to invest in a custom theme for your website, conduct thorough due diligence before settling on one.
The theme selection takeaway: it must satisfy all requirements, both aesthetic and technical.
We’ll revisit website themes in the website optimization section ahead.
Website Design Media Attributions
-
Jack Moreh
davebrenner
Image by vectorjuice on Freepik
Image by Freepik
© Martin Wensley, 2023-2025 --- DIY Free Website Design