


Irrespective of the brand of the CMS that powers your website, you need, at least in 90% of the cases, to configure your website’s email server.
This guide should have been a section in my previous guide “How To Create a Website with Everything in 2 Weeks”, but I forgot to add this information, so here is a brand new guide.
It’s a relatively quick and easy task to do, but you may get stuck in one or two of its steps. I know it can happen. It happened to me.
Some functions of a website’s email server
-
User validation procedures
CMS alerts
CMS extensions/plugins alerts
To provide email accounts to users of the website
To create a professional email address
First test your Website’s Email Server
Your CMS may well have a way to test the email server. Be sure to find it, and do a test. The test is going to be sending an email somewhere. Generally, to the email account associated with the website’s admin.
If the test works, from the CMS’s backend it is a good sign. Still, the email server may work in a test situation, but not in the actual instances it should work for your visitors and members.
To test that, first, check the CMS settings for:
-
Allowing user registrations, and
User validation methods. You should have email validation enabled.
After you check that, create a new user account as a normal user would do (not as an admin in the website’s back-end) and see if the CMS sends the activation link to the email address you entered.
Regardless, if you aren’t going to support user accounts, it’s still good to make sure that other things that depend on the site’s email server do work.
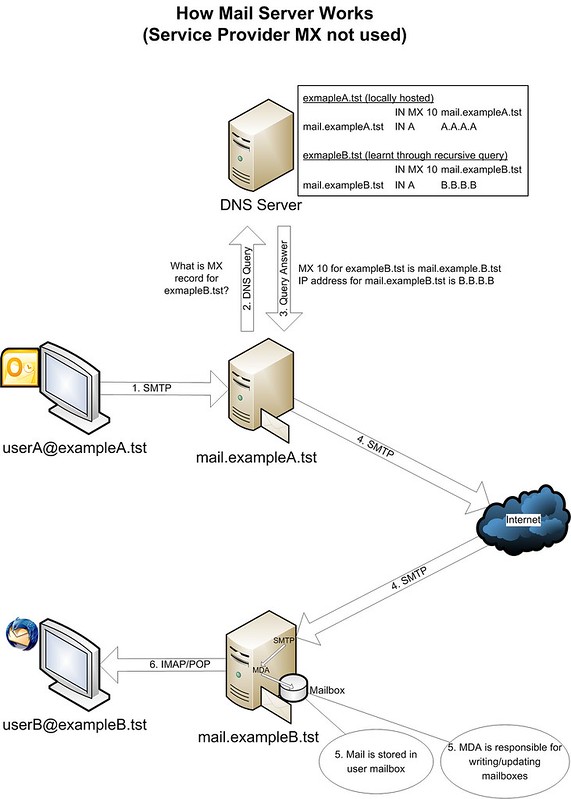
Configure Email Server Settings
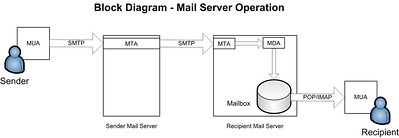
Authentication is required for IMAP and SMTP. We’ll be using SMTP, so configuring the mail server is a must.
Start by checking on your website’s control panel provided by your hosting service.
Find the mail options or tools provided by your hosting.
Somewhere in that section, you will find two important addresses:
-
The server’s address
The server’s SMTP port
Once you have those two items, it’s time to head to your site’s DNS configuration wherever it may be, your hosting service, your CDN provider, etc.
Some of the settings you may find in the email server configuration are:
-
Encryption
SMTP Host
SMT Port
Authentication
SMTP User
Password
The fastest way to fill all of these parameters correctly is by searching a guide on the web for the specific hosting service you are using. Or you can consult the hosting service’s help pages on their website.
Next, you will be creating several DNS records of the TXT type to make your email server secure. When I wrote at the start of this guide that you may get stuck in several steps of this guide, it was based on my experience creating records, so here comes the tricky part.
How to Create Email Server DNS Records
SPF and DKIM are the first two DNS records your website's email server needs to create to avoid the emails from your website becoming an asset in the hands of black hat hackers, scammers, phishers, and other internet rabble.
There’s also DMARC, which builds on both SPF and DKIM.
In your hosting service’s website control panel, in the email settings, there should be a subsection called authentication. In that section you should see the stats of your site’s mail server.
If you are genuinely interested in the nitty-gritty of how these things work, I would recommend this in-depth guide. Otherwise, keep reading for a fast setting up of the records the mail server needs.
Ideally, the hosting service your website is running on will provide a one-click solution to setting up these three records. Or they may set it up for you for no additional cost.
But in the case that they don’t, or in the other very common case, when your website’s DNS is not handled by your hosting service (but by a CDN, a paid DNS service, etc), then you’ll have to set them up yourself.
To enter the records go to the page where you have set up your site’s DNS, which generally is a section in the hosting control panel.
Or if your website’s DNS is handled by, for example, Cloudflare, then you must set the following three records in the DNS settings there.
SPF Record
SPF stands for Sender Policy Framework. The SPF record is a list of email servers authorized to send emails from your website’s IP address.
It should look something like this:
v=spf1 a mx ip4:555.555.555.555 ~all
Where you replace the corncob of 5s with the actual IP address of your website.
You must search the support help pages of your hosting provider and find a page with the exact SPF record string you must enter for your specific hosting service.
In the case your hosting doesn’t have a help page contact them or search it on a search engine.
If you are willing to try yourself without any help, be ready to do some trial and error.
Maybe you can get away with a generic configuration (like the one in the example above), but it’s always better to be sure and check the specific parameters for the specific hosting service.
DKIM Record
DKIM stands for DomainKeys Identified Mail. It’s a record that prevents spammers from spoofing (impersonating) a legitimate domain. The DKIM record authenticates from where an email came from by adding a key or signature to your site’s DNS records.
DKIM guarantees the email wasn’t tampered with while it was in transit.
The TXT DKIM record you have to add to your site’s DNS configuration encapsulates a cryptographic key used to verify an email sender’s (you, your site, and anyone else who has an account in your domain) identity.
Now, this record isn’t something as forgiving as the SPF one. You can’t get away with creating it yourself or using a web app to generate it. It should be provided by your hosting service’s website control panel. In the authentication section of the email server’s configuration.
You simply need to copy the string from there and paste it into a new TXT record in your site’s DNS settings.
DMARC Record
This validation system prevents your site’s domain name from being used to perpetrate different cybercrimes. Like email spoofing, domain spoofing, phishing scams, and the like.
DMARC enhances the authentication capabilities of both SPF and DKIM and also provides a failsafe mechanism when either or both SPF and DKIM fail.
Hopefully, your hosting provider supports it, otherwise, it’s time to rethink if that hosting service is good for you.
Not implementing as many protections (DMARC being one of them) from email attacks as possible is not a good idea.
Testing The Email Server
Once you enter all three records on the website’s DNS configuration, you must do a few tests.
Repeat the test of creating a new user to trigger a validation email. Or if the users' manager of your CMS has the option to send a determined user a validation message via a button, use that.
Another thing to check to know if your website’s mail server works is to check the email account settings in your hosting back-end. Somewhere over there there have to be indicators of the site’s email server status.
Your website needs to show SPF, DKIM, and DMARC all three of them in working order.
As a last test and to be sure of what exactly is working or not working, run your website’s domain through this tool.
If you did everything in this guide to the best of your abilities and at least one function of the website’s email server is not working, then don’t be shy of contacting the customer support service of your web hosting service.
You already did all of the heavy work and learned where everything is. The only thing left now is tweaking what’s not working for it to work.
Media Attributions
Image by Gerd Altmann from Pixabay
© Martin Wensley, 2024 — How to Configure Your Website's Email Server